Murray Cabin in Quesnel, BC

Editor’s Note:  This post was started a year ago, but never completed.  I am posting this in late 2015, but this adventure took place in late 2014.

Here on the West Coast, we have wet (not white) Christmases.  We spend most of our Winters sporting gum boots and rain jackets, not UGG’s and parkas.  Our accessory of choice is the umbrella, not the shovel.  This is our norm.

So when I was invited to spend Christmas in the Great White Northern BC town of Quesnel, I couldn’t pass it up!  And the thing to do in the Great White Northern BC town of Quesnel is ski.  And ski we did!

My boyfriend Eric and his father Herb took me through the Cariboo backcountry to Murray Cabin.

The Yellowtail trailhead is located about an hour or so South of Quesnel.  I was asked by a local to keep the location of the trailhead and the cabin relatively secret.

The trail begins from the parking lot, zig-zagging over a creek for a few kilometres, and then eventually up a hill for a few more through the forest.  This is a slow, but beautiful beginning to get you warmed up.

At the top of the hill, at about the 4km mark, we come an opening.  This opening is thanks to a few eager beavers who built a dam at the edge at the opening.  We skin over the dam that is buried deep under the snow.  I’m not sure if the beavers still leave there.

Past the opening, we continue slowly upwards and around the edge of another hill.  After one final opening, at about the 6km mark, we eventually make it to the Murray Cabin.

MurrayCabin

We stop at the Murray Cabin for a short snack, to drop off our overnight gear, then head out again for a few runs on the north facing hillside.

There is a beautiful hillside a short skin away from the cabin.  We skinned up and skied down a few times before we called it a day.

InsideMurrayCabin

That night, Eric made a goulash.  Herb and I were too impatient to wait the several hours for the goulash to stew. We played cards, drank wine, read, ate, and then called it a night.

There were several mattresses upstairs and two downstairs.  Plenty of room for group overnight backcountry trips.

The next day, we hiked up the hillside to do a few more up-and-downs the hill before going back to down to the truck.

Cariboo

View of the Cariboo Mountains, midway up the hillside

I think the locals call the hillside “the lump” or “the bump”, but I’m not sure.  I gives a beautiful North to the Cariboo Mountains.

Herb-on-the-Hill

Herb, taking in the view of the Cariboo Mountains

After one or two skin-ups and ski-downs, we decided to head back down to the truck.

On our way down, finding the creek crossings proved difficult.  The two experts in the group, Eric and his dad Herb, fell into the creek.  I was quite proud to not be the victim in this incident.

Eric-Herb-Creek

If you’re in or around Quesnel and want to experience the Cariboo backcountry, I suggest checking out the Cariboo Ski Touring Club.

Thank you Herb and Eric for taking me on this adventure!

🙂 Julie

Batchelor Lake Cabin at Tetrahedron Provincial Park

One of my favourite things about living in Vancouver is the quick and easy access to some amazing backcountry territory.  Over the holidays, a group of us heading out to the Tetrahedron Provincial Park for the first time.

The park is located at the end of a logging road outside Sechelt, BC, which is roughly 2 to 3 hours outside Vancouver, including a 50-minute ferry ride.

Day One – Lower parking lot to Batchelor Lake Cabin

Given our late start in the day, we opted for the Batchelor Lake Cabin which is only 3km from the lower parking lot.  There was just enough snow to cover the rocks on the trail for the first 1km, up until to the trail splits.  Batchelor Lake Cabin is one way, and access to Edwards Lake Cabin, McNair Cabin, and Steele Cabin the other.

Unfortunately, there wasn’t enough snow yet to completely cover all areas of the forest.  Some bush-wacking on skis was involved.

Exhibit A: skinning over blueberry bushes

Exhibit A: skinning through and on blueberry bushes; not as easy as it looks!

Fortunately, it was cold enough that both Tannis Lake and Batchelor Lake were frozen over.  As a result, we could easily glide over the fresh layer of snow on the frozen lakes.

Upon arriving at the cabin, we started a fire and made dinner: palek paneer and dal lentils (packaged, of course; we’re not that fancy).  We had the whole cabin to ourselves until about 7PM when a group of five came in from McNair.

The short distance to Batchelor Lake Cabin makes it a good introduction to any newcomers to backcountry skiing, like myself.  The cabin is really well kept and spacious.

Day Two – Day trip to Edwards Lake Cabin

Given the spaciousness and relatively low occupancy of Batchelor Lake Cabin, we decided to leave our things at Batchelor and make a small day trip to Mt. Steele.  We also decided to use the summer trail instead of the winter trail to save time.  There’s a reason it’s called the “summer” trail: too windy and too bare for skiis.  We had to carry our skiis and poles through the tight-winding forest for ten or so minutes until we reached the winter trail.

Upon emerging from the forest, we headed East to the top of a ridge and continued for 1km or so more.  When we reached a directional sign, we realized we wouldn’t have time to make it to Mt. Steele and back in the short of window of time we had.  Instead, we opted to continue to Edwards, which was only 2.7km more.

It was cloudy so the views weren’t spectacular, but the display of large, overhanging icicles on our right made for a neat sight.

Icicles dripping from above, along the ridge to Edwards Lake.

Icicles dripping from above, along the ridge to Edwards Lake.

At the end of the ridge, we weaved through more forest for a short while until we reached Edwards Lake.  Edwards Lake is much bigger than Tannis and Batchelor, but has an oddly spooky vibe about it.  At least, that’s how I felt.

The visibility had decreased significantly so we couldn’t cross the lake blindly.  We followed in the tracks left in the snow, which led us around the lake, to the other side.

The Edwards Lake Cabin is about 500m from the lake itself so we had some trouble finding it.  Many tracks, going off in different directions, had been left in the snow and we weren’t sure which tracks led to the cabin.  Luckily, Kamil had brought his GPS and we found the cabin a short while later.

The Edwards Lake Cabin is considerably smaller than Batchelor.  It’s location, however, is ideal for those planning on doing multi-day trips in the Park.  The cabin is roughly halfway between the parking lot and Mt. Steele, a supposedly lovely backcountry skiing area, and the Mt. Steele Cabin.

On Tannis Lake.  Easy gliding.

Day One – Sunshine!  On Tannis Lake. Easy gliding.

We made lunch in the cabin and quickly headed back.  I realized I had forgotten my headlamp and if we doddled any longer, we risked returning in the dark.

Considering we knew the way back quite well at this point, and considering many parts of the trek back to Batchelor Lake Cabin were downhill, our return to Batchelor was significantly faster.  We reached the Cabin with an hour before dark.

Dinner was Swiss fondue with French baguettes from A Bread Affair (arguably the best bread bakery in Vancouver).  Card games ensued.

Day Three – Batchelor Lake Cabin to lower parking lot

Considering we didn’t have a schedule for the Sechelt-Horseshoe Bay ferry, we got up early and cleared out as fast as we .

Crossing Tannis Lake proved difficult since warm running water had melted some of the ice on the lake.  A long, large smudge of slush cut the lake in half, making crossing quite impossible.  Eventually, we found a small opening, off to the side, which was solid enough for us to ski on.

From there, we booked it down to the parking lot.  Our descent was quick since the last 1km was all downhill (no skins = fast fun times).  Also, great time for me to practice my turning..

Leaving Batchelor Lake Cabin on Day Three.

Leaving Batchelor Lake Cabin on Day Three.

We didn’t see much of the Tetrahedron Provincial Park this trip.  Granted, we only had three days and had a late start on Day One.

Also, in late December there isn’t that much snow on the trail yet.  I would love to return in a month or so to discover more of the park.

Fingers crossed for nice weather, more snow, and a new adventure!

Until next time,

🙂 Julie

Posted in Uncategorized

Not all who wander…

If 2014 were to have a quote of the year, it would be J.R.R. Tolkien’s: “Not all who wander are lost.”  This little inspiration quote was everywhere this past year, despite the fact that it’s a misquote.

The line is part of a poem, “Riddle of Strider” from Lord of the Rings.   The poem, or riddle, was written by Bilbo about Aragorn to explain Aragorn’s hidden or masked importance in the world.  Aragorn, who has claim to the throne of Gondor, isn’t what he appears to many, including a wanderer, but that he has the power to change the world.

Properly quoted street art

Properly quoted street art

Out of context, however, the quote gives hope to those who are doubtful or those who appear lost and that, eventually, they will find a way.

Why, though, in 2014, has this become so important to so many?

I’m currently wrapping up my Bachelor’s degree, and I am sometimes filled with doubt.  I’m apparently not alone in this feeling.  Many articles have been written in recent years that reflect an uncertainty in millennials.

Less millennials are getting married because many grew up with divorced parents.  Less millennials, at least in Vancouver, are purchasing homes and are opting to rent their home instead.  More millennials are seeking graduate degrees because of the uncertainty and the competitiveness in the market.  More millennials are experimenting with their sexuality and are feeling more open to it.  More are choosing to travel after high school before starting university.  Many of us will be changing our careers a few times, if we haven’t already.

Maybe this quote has always been a source of inspiration for those encountering uncertainty.  Only these days, social media has made this quote en vogue.

Many millennials may appear lost, but like Strider, we do have the power to change the world.  Whether this change will be for good or for bad, that will be known only to the generation that follows us.

So to all those wanderers out there, wander on!

Berg Lake Trail in Mount Robson Provincial Park

These days, as a student, I don’t get to go adventuring much.  But this summer came an opportunity I couldn’t pass up.

My boyfriend Eric’s longtime friend Martina was getting married in their hometown of Quesnel, BC.  Since we’d be in the North, Eric suggested we hike the Berg Lake Trail, in the Mount Robson Provincial Park, after the wedding.  And so, I took a week off work and spent four days in the Alpine Rockies.

Driving East from Prince George, BC along Highway 16, you pass through the foothills and eventually the Rocky Mountains.  One of the most photographed mountains in the Canadian Rockies is Mount Robson, whose summit is only visible 28 days out of the year.  Luckily, the sun and the summit were out all four days of our expedition.

Day 1: Mount Robson Campground to Whitehorn

The hike begins from the parking lot at the base of Mount Robson, at an elevation of 853m.  You immediately cross the Robson River and begin following it.  In fact, the Berg Lake Trail follows the Robson River all the way to the Robson Glacier, some 30k+ up the trail.   But I’ll get there in a bit.

DSC_0302

Mount Robson from the Base Parking Lot

On day one, the hike was a relatively stead and flat 10k.  We stopped not far after the 4k point on a beach on Kinney Lake, through which the Robson River passes, for lunch.  We couldn’t help but feel lucky for the weather, especially considering it was pouring hard the night before.

The trail hugs along the shoreline of Kinney Lake for another two kilometers to the Kinney Lake campground.  We crossed a few streams and even passed through a small island mid-river.

Eric taking a breather by Kinney Lake

Eric taking a breather by Kinney Lake

The 6k to 7k stretch led us up and down along the River through a forest we dubbed “the Lord of the Rings Forest”.  The trail wound around massive boulders that appear to have fallen off of the cliffs above.  These massive rocks are almost perfectly cubed in shape, as if they were giant toy blocks for a giant baby to play with.

The last few kilometers to Whitehorn Campground were again not too difficult.  They rose gently through the shaded forest, with framed views of Kinney Lake and the valley below and behind us.

We finally arrived at the campground, still with much daylight left.  We set-up our tent and made dinner: spiced couscous with dried fruits, beef jerky and pepperoni.

Distance traveled on Day 1 = 11k.  Elevation gain = 244m.

Day 2: Whitehorn campground to Berg Lake Campground

We started early one Day Two.  I have a habit of getting up early and I can’t seem to shake it, even on vacation.  Whitehorn campground is nestled neatly in the Valley of a Thousand Falls.  Walking through the valley, it’s easy to see why it holds this name.  Everywhere, on every mountain ledge above, you can see a tiny waterfall trickling down the mountain side.

After an easy stride across the valley, the trail meets another steep hill and goes up and up and up.

The trial snakes along a steep hill, passing three waterfalls along the way: the White Falls, the Falls of the Pools, and finally the breathtaking Emperor Falls.

We had only gone up a few hundred meters up the path before I needed to stop for “fuel”.  A few hundred meters later, we stopped again for lunch in a shady patch on a cliff overlooking Emperor Falls.

Elevation gain from Whitehorn to Emperor Falls

Elevation gain from Whitehorn to Emperor Falls

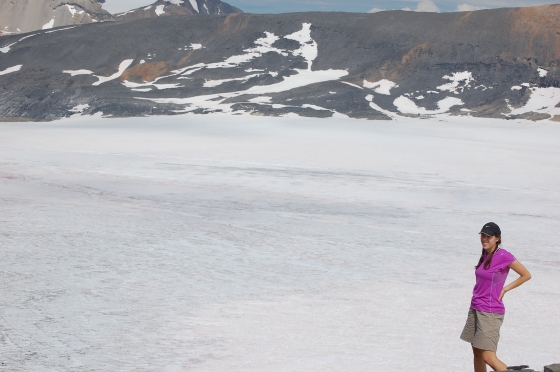
After reaching the top of the hill, we still had another 6k ahead of us and the terrain wasn’t exactly peachy.  Immediately after Emperor Falls comes the Emperor Falls campground.  After a few hundred meters of gentle forest path, still following Robson River, the path curves around steep slopes of sheath.  Looking down ahead, we could see Mist Lake.

Me, with the Mist Glacier in the background.

Me, with the Mist Glacier in the background.

The trail hugs around the steep hills until it finally descends into a plain.  Thanks to the ice ages that have passed before us, the plain is barren and uninhabitable except for a few tiny shrubs every hundred meters or so.  It stretches out for a half-kilometer wide and over a kilometer in length.  At the edge of the plain, you have a wonderful view of Mist Lake.

The trial swoops back into the forest for the final three kilometers along Berg Lake to Berg Lake campground.    Cue jaw drop.

The Berg Lake campground is tucked away in an evergreen forest along the Southwest side of Berg Lake facing the majestic Berg Glacier, a five-thousand year-old block of ice cemented into Mount Robson.  Every ten minutes or so, you can hear a cracking in the distance.  That’s the sound of ice breaking off the Glacier and splashing into the Lake below, forming icebergs which float to shore.


We didn’t bother setting up our tent right away.  The sun was still strong in the early afternoon so we decided to take a dip in the lake.  Key word: dip.  Not swim.  We lay on the pebbled beach, basking in the sun for an hour or so.

We had climbed over 800m that day and had another 800m ahead of us the next.

For dinner, we had Kraft Dinner and a dehydrated meal.  Kraft Dinner for the win.

After dinner, we went on a nice stroll along the Lake and sat on a log bench watching the Glacier.

Mount Robson at dusk.

Mount Robson at dusk.

Distance traveled on Day 2 = 10k.  Elevation gain = 544m.

Day 3: Day hike to Snowbird Pass

Unlike many of the other hikers who attempted Snowbird Pass that day, we slept in.  We had been warned the night before by other campers that Snowbird Pass is easily an eight-hour trek, so best you get up early.  We had planned to get up at 7 and hit the trails by 9.  Instead, we awoke at 9:12AM and we were ready to go just after 11.  I wasn’t too thrilled at the prospect that we’d stuck in the mountains until 7PM.  That didn’t faze Eric, though.

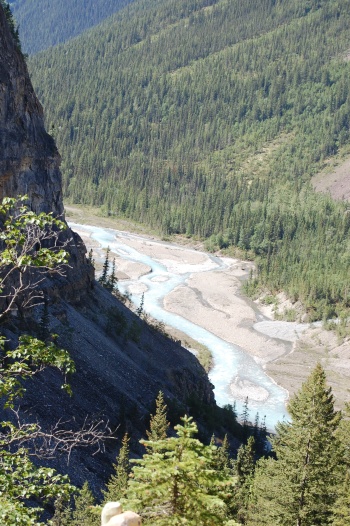
The hike is 22k to the Pass and back, and can be divided into four sections.  The first section, the flattest, is three kilometers of sheath rock trail along the Robson River.  It winds along the West bank of the Robson River around the West side of Rearguard Mountain.  This is when you get your first glimpse of the Robson Glacier at the mouth of the Robson River.
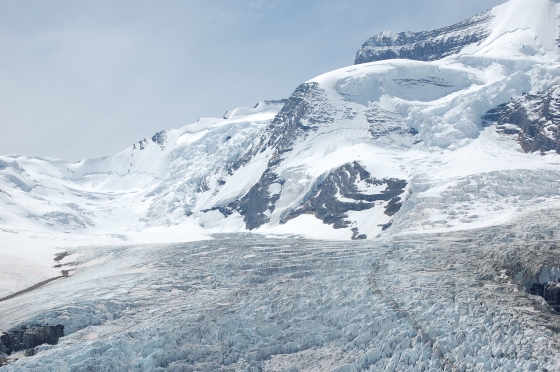
Robson Glacier

Robson Glacier

During this first section of the hike, we passed many hikers going back to camp.  They had started early, but nearing noon when they had reached the halfway point, the weather began to look less promising, with grey clouds quickly approaching.  Attempting the second part in clear skies is treacherous alright.  Forget about doing it in the rain. Because of this, many of the early bird hikers had turned back before reaching the Pass.  Once we reached the beginning of the second section, at the foothill of a steep ascent, the clouds began to clear.

The second section begins abruptly with a sharp turn up towards the mountains, climbing over boulders.  It’s hard to follow as the trail isn’t well walked on, but marked by cairns every couple of meters or so. We stopped twice at two glacier-fed streams for water.  We had already depleted our 2.5 L we had brought with us from camp and we were not even at the halfway point yet.

At the top, the trail turns into a narrow rock walkway, only a meter wide, that drops off into the valley below, some 800m down.  This walkway offers the best view of the Robson Glacier, to the East.  On the ascent, I found this walkway spectacular.  On the descent, I found it terrifying as you can see very well how far down your body will fall if you take a wrong step.  By the way, there is nothing to hold on to.  A heavy Easterly gust could push you over the edge.

At the end of the rock walkway, about a kilometer long, the trail curves up around a waterfall and then dips into a meadow.  The third section, Alpine Meadow, is quite the surprise.  After spending the last three hours on dry rocks, with little to no vegetation, you’re suddenly  immersed in this Sound of Music meadow with a stream running through it and butterflies dancing in the air.

We sat in the Meadow to eat our lunch.  We soon realized some marmots closeby were planning a covert operation to steal our lunch.
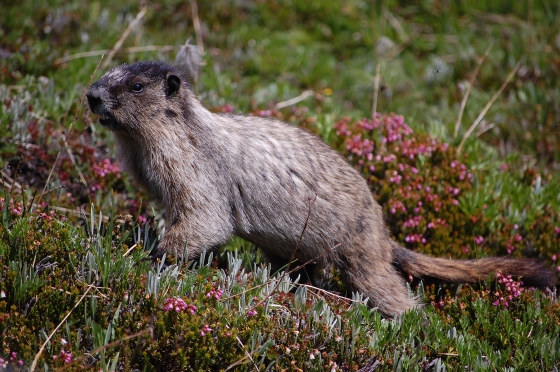
Marmot!

Marmot!

During lunch, another hiker passed by on his way back to camp.  He told us we weren’t far from the Pass, only 2k.

After our short break, we began making our way to the Pass.  From the Meadow, the Pass is less than a 2k distance but at an elevation gain of 100m from the Meadow.  It’s steep.  And past a certain point, you realize you’re feeling the effect of high altitude as climbing gets harder and harder.  Each step takes more energy than the last and you’re moving slower than your Great Aunt Martha.

Eventually, though, we made it to the top of Snowbird Pass, a saddle wedged between Lynx Mountain and Titkana Mountain looking East over the Coalman Icefield.  This makes it all worth it.  The ice field is huge.    Imagine looking down at Greater Vancouver from Grouse and seeing a giant sheet of ice.  Here, we are at an elevation of 2,428m.

Atop Snowbird Pass, overlooking the Coalman Icefield

Atop Snowbird Pass, overlooking the Coalman Icefield

We didn’t stay for long.  Again, we had run out of water and were starting to get hungry.  The descent back down to camp took three hours, but we booked it near the end, almost sprinting.  Needless to say, we were exhausted!

That night, we had curried eggplant and rice burritos for dinner.  Amazing!

Total distance traveled on Day 3= 22k. Elevation gain = 800m.

Day 4: Berg Lake to Mount Robson parking lot.  Then drive to Jasper

For the second time this week, and a rare event in itself, Eric got up first.  And boy was it early.  4:54 AM, to be exact.  We ate a big breakfast; trying to finish off any food we had leftover.  We left the camp just past 7AM and only stopped at Whitehorn for second breakfast, then shortly after so I could change into shorts and t-shirt.

After Emperor Falls, we began passing lots of day hikers.

Eventually, we had to stop again.  Eric’s legs were soar and my feet were aching.  We stopped at Kinney Lake for some water and to soak our feet in the cold lake to ease the soreness.  We were only 5k from the parking lot. So close!

But we made it.  Getting to the car was such a relief.  We were so tired and sore, but so happy.  We did it!

Total distance traveled on Day 4: 21k.  Elevation gain = – 1,600m.

Total distance traveled since Day 1: 63k.

Overall, the Berg Lake Trail is an excellent way to spend a few days in the Rockies.  Reservations are required, meaning the trail doesn’t get too crowded in the summer.  Day hikes to Kinney Lake and Emperor Falls are free, but I recommend going farther.  The further the better.  There are plenty of day hikes to do from the Berg Lake Campground, so you can spend more than a few nights there.

Until next time,

🙂 Julie

Juan de Fuca Trail

This summer, my roommate Leslie, her fiancé Kevin and I hiked the coastal Juan de Fuca Trail.  The trail is 44km long and is located roughly 80km West of our hometown Victoria on Vancouver Island, BC.  If you’re on the Island, I highly recommend this four-day hike along the beautiful and breathtaking Northwest Coast.

We hiked 11-14 km per day, carrying roughly 20 lbs. on our backs for roughly five to six hours a day.  This was definitely a highlight of my summer!

Day 1: to China Beach to Mystic Beach to Bear Beach

From the parking lot at China Beach, you hike 2km outland to Mystic Beach.  As its name suggests, Mystic is, well, mystic!  Seriously!  The pebbled beach is squished between rising cliffs and tall evergreens on the East side and wide ocean expanse on the West.  Mystic is one of the camp-ready beaches on the Trail.  We took a small break to snack, then picked up again.

A long way down to Mystic Beach

We continued onwards to Bear Beach where we quickly found a campsite, sheltered under the trees and hidden from the beach.  We pitched the tent, started a fire and ate dinner.

After the first day. From left: Leslie and I.

The weather on the first day was perfect: not too warm, but not too cold either.  Also, the trails between the beaches on this first were not too difficult despite our heavy backpacks.

Day 2: Bear Beach to Chin Beach

In the little guidebook, lent to us by my dear aunt, the Bear to Chin section was considered the most difficult section of the Trail.  Luckily for us, the sky was clear and not a drop of rain fell on us!

Me. Heading out, start of Day 2.

This section , although beginning on the beach, is spent in the forest hiking up and down hills.  Many, many hills.  To be exact, we counted 17 hills, each taking anywhere from 20 to 45  minutes to ascend and descend.

But do not be discouraged!

After the first ten up-and-downs, you get used to it.  Also, the sections spent in the forest are worth it.  Intermittent cracks through the branches and foliage give a sneak peak of the ocean scenery to come.

Beautiful day on Day 2

Arrived at Chin Beach, we set up camp and ate dinner.  I had Mac n Cheese.  Gross.

Day 3: Chin Beach to Little Kuitshe Creek via Sombrio Beach

The rain had started to fall early the night before and had left the hikers with pools of mud on the trail.  We were discover that mud sucks.  It can turn a ‘moderate’ hike into a ‘challenging’ hike.  Good thing my aunt lent me her gators.

Mud, mud and logs

We were lucky to have patches of sunshine during the first half of the day.  The third day of the Trail was spent zig-zagging between the forest and pebble-beached shoreline on Sombrio Beach.

Sombrio Beach on Day 3

We walked a few kilometers along Sombrio before passing a small group of children, aged between ten and twelve years, by accompanied by two young leaders.  They were Camp Thunderbird kids here to hike from Sombrio to Parkinson Creek, via one night in Little Kuitshe Creek.

As we were also planning on staying the night at Little Kuitshe Creek, we hurried the last few kilometers to snag a campsite before they arrived.  The Little Kuitshe Creek Campsite is one of two campsites located deep in the forest, far from the beach.  At the campsite, we met John from Newfoundland, who would later join us for dinner.

An hour or so later, the kids from Camp Thunderbird arrived and set up their camp, which consisted of hanging tarps from trees.  Not the best shelter from the West Coast Rainforest.

Day 4: Little Kiutshe Creek to Botanical Beach

The rain continued throughout the night and we awoke to puddles here-and-there in the campsite.  Thankfully, we were dry.  The Camp Thunderbird kids, on the other hand, were not so lucky, or dry.  They appeared to be having fun, nevertheless.

Along with our new friend John the Newfie, we set off early to conquer our last leg of the Trail.

This leg, according to the guidebook, was the flattest and therefore the easiest.  The mud, aka a hiker’s worst enemy, made this last leg a struggle.  Luckily, we each had a good pair of hiking boots, rain pants and gators.  A word to anyone willing to undertake any West Coast hiking trail: take these three items with you!

Every few hundred meters was met with knee-deep puddles (or pools) of mud so thick and sticky you could easily lose a shoe in one of them.

At a given opportunity, we took a “shortcut” along the beach.  For almost a kilometer, we hiked along the misty shoreline on the reef shelves.

Reef Shelves and mist on Day 4

It was along these gorgeous reef shelves that we encountered a small black bear.  He (or she) had been following us for the last few hundred meters, but had eventually caught up with us.  We hadn’t taken much of a fright from it.  In fact, we ignored it most of the time, until it began to approach us, head on.  I couldn’t manage to get my bear spray in time, but John already had his bear-banger (a small pen-shaped device that makes a loud “Bang!”) ready.  The bear was less than twenty feet from us when John shot off his bear-banger.  A loud shotgun sound burst  and the bear turned and ran to the forest.  We all breathed a major sigh of relief.

Regardless of our near-encounter, we had to eventually return to the forest as the tide was too hide to continue along reef.  Unfortunately, we had long passed the trail head back into the forest.  Our quickest solution was to bushwack our way back to the trail.  Oddly enough, this part wasn’t as hard as I would’ve imagine.  Within two hundred meters or so, we found ourselves in the Payzant Creek campsite.  The hard part proved to be finding our way back to the Trail from the campsite.  It’s a maze!

After going round in circles for nearly ten minutes in the campsite, we found the Trail again.  From the Payzant Creek campsite, we counted down the last seven kilometers back to Botanical Beach.

Two hours later, we finally arrived at Botanical (aka the END)!

Done! From left: Leslie, Kevin and I.

Four days, three nights and 44km later, we had completed the Juan de Fuca Trail!  What an experience!  If ever you should be on Vancouver Island have four days and lots of energy to spare, I highly recommend this purely West Coast adventure!

Until the next adventure,

🙂 Julie

My Best Friend’s Blog

My best friend in the whole wide world is currently in Med School in Croatia.  The lovely Amanda has started a blog in September to keep us back home up-to-date with her daily life.  Because being a Med Student is so demanding, her posts are often short, but never short of sweet! 

Check out Amanda’s here.

🙂 Julie

Posted in Uncategorized

WWOOF-ing 101

It’s been almost a year since I got back from Europe and I’m still receiving e-mails from people who want to try WWOOF-ing.  A lot of people want to know the name of that WWOOF #5 (I’ll never tell, so stop asking).  But most people want to know how it works and what to expect.  And so, I’ve written this post, “WWOOF-ing 101” for anyone who’s curious about WWOOFing.

So let’s start from the beginning, shall we?

What is WWOOF-ing?

If the description on the official website (click here) wasn’t descriptive enough, here it is again!

WWOOF is an exchange – In return for volunteer help, WWOOF hosts offer food, accommodation and opportunities to learn about organic lifestyles.

If that’s still not registering, here’s the simplest possible description:  you (prospective WWOOFer) will go work on a farm in exchange for food and housing.  You will sleep in their homes (or their garages/chicken coops/tents/ caravans/ kid’s room/ home offices).  You eat their delicious/disgusting/bland/culturally-typical food.  You will learn about life, love and yourself.  (Okay, I’m stretching it with that last bit, but it’s not far off…)

Working in the vines in Italy

But please, here are some guidelines…

In my travels, I came across some mixed reviews about WWOOF-ing.  I’ve lived my share of bad experiences and heard some more.  But most bad experiences can be avoided if you (the prospective WWOOFer) follow these guidelines.

1.  Expect the unexpected.

No matter how many details are listed in the WWOOF postings, the farms you will go to will never be anything like what you were expecting.  This can be good and this can be bad.  But don’t fret!  WWOOF-ing is about adventure!  So you’re shacking up in a rotting cabin with hundreds of mosquitos.  It’s all part of the fun!  If you can rough it, it’ll make for an interesting story later on.  If you can’t, go find yourself a five-star, Michelin-rated bungalow and stop complaining!

True story: I worked on a farm in France and the farmer asked me to translate an e-mail he had received from a couple in New York.  The e-mail read like an e-Harmony questionnaire.  They wanted to know how far from Toulouse the farm was situated (in miles and in hours by train), what the accommodation was like, what they’d be eating, when they’d be working, what kind of work was expected, if they’d get days off, etc.  Midway through translation, the French farmer stopped me.  He asked to reply to their e-mail.  He was rejecting them because of their lack of adventure.  While these were all valid questions to ask, I had to agree with the farmer’s position on the matter.  These people clearly were expecting one thing for their summer vacation.  And if they didn’t get it (which they probably weren’t), they wouldn’t be happy.  And neither would the French farmer.  I digress.

It’s normal for you to be excited and nervous about your first WWOOF experience, and that’s okay.  As you go on and work more farms, you’ll learn to loosen up and take whatever is coming your way with a positive and adventurous attitude.  It makes for very attractive personality traits as well.

Be open to surprises.  They can be good.  They can be bad.  They can be surprisingly awesome!

2. Be a good house-guest.

If I had to choose two words to describe a WWOOF-er, they’d be: laborer and house-guest.  While the earlier is a given, the latter isn’t always so obvious.  But being a good house-guest is just as important, if not more, to maintaining a good relationship between WWOOFer and host.

After receiving strangers in their homes week-in and week-out, many hosts have certain expectations of their WWOOF-ers.  There’s the obvious: don’t hog the couch/shower/food/whatever; be polite; pick-up after yourself.  Also, on all of the farms I’ve worked on, I was asked to do the dishes after dinner.  These are all expected of you as a house-guest, so don’t whine about their house rules.  They did make you dinner after all!

But it’s not just about chores.   Be social!  I’ll admit that on my first ever WWOOF, I was a complete anti-social brat.  After dinner, I’d do the dishes then head straight to the caravan (my accommodation) and watch Planet Earth with the headphones on.  Big no-no.  Stay and chat!  My favorite memories of WWOOF-ing are the post-dinner political chats, cultural teachings and all around celebrations of life.  Don’t be shy!  Make friends!  Be social!

3. Work

This is obvious.

Because there is no exchange of money, WWOOF (as in the organization) has set up guidelines for both workers and hosts to follow.  Hosts may ask their WWOOFers to work a maximum of six hours of labor per day, six days a week.

For many big-city westerners, working in the country may sound bucolic, but it’s a lot harder than many imagine.  But if the hosts are accommodating you nicely and feeding you full every night, you have to do your part.  Fair is fair.  If you don’t meet their working expectations, they may speak up.  If they do, this makes for awkward dinner conversation.

Working away in France

Not only that, but most of the farms posted depend on WWOOFers to make ends meat.  This may be your vacation, but it’s their work (and their life) you’re helping support.

In short: don’t be a freeloading traveler and put in your hours!

That said, I have worked on a farm where the host has juiced me for more than my WWOOF-ing hours worth.  If this happens to you, speak up to your host first.  Tell him/her that you’ve worked over six hours today.  If they nod but continue to work you overtime day after day, report them (HONESTLY* and OBJECTIVELY*) to WWOOF.org.

* One WWOOF host I worked for contacted me a year later to act as a witness on his behalf.  Apparently, one WWOOFer he hosted barely put in her hours and he confronted her about it.  She left the farm the next day.  A few weeks later, his WWOOF Host membership was revoked because of false claims this lazy WWOOFer had made about him.  Because of an injury he had suffered while I was there, he can’t do farm work alone.  Not only that, but he depends on WWOOFers to help maintain his farm and his crop. Luckily, previous WWOOFers, who are now good friends of his, have decided to help him out.  *

Why WWOOF-ing?

1. It’s cheap!  No kidding.  As a (lazy) student traveller on a budget, WWOOF-ing was perfect for me.  I’d stay put (geographically speaking) for two weeks at a time and not spend a dime.  Jumping from hostel-to-hostel was, in my opinion, way more exhausting than hard labour in the (picturesque) field.

2.  You’re totally immersed in the culture.  I learned way more about Italy living with an Italian family, speaking Italian, eating Italian food, watching Italian television than I ever would in my Italian hotel room reading my Italian guidebook with my non-Italian travel buddies.

3. It’s so much fun!  The hosts are awesome!  You eat amazing food.  There are other WWOOFers on the same farm; you make friends.  You watch a baby deer being born.  You go for a hike in the nearby woods.  You play with the house cat.  You make wine! You go to the market.  Sell some jams.  Buy some pattiseries.  You take pictures.  Show your family.  What’s not to love?!

Bonus: street cred.  “So you took cooking lessons taught by Jamie Oliver?  Pst! I was taught by Italian gypsies in a 12th-Century shack in the Tuscan countryside how to make real Italian sugo di pomodoro fresco al basilico, senza electrical devices.”

Hopefully, this answered all your questions you may have had about WWOOF-ing.  But from the bottom of my heart, I think it’s something everyone who loves a good adventure should try.

Safe travels!

🙂 Julie

Taylor Beach

Because we live so close to the Albert Head Military Base, we often hear training drills in the distance.  Over the last few years of living here, we barely notice it anymore, but our dog does.  And for Claus, this is hell.  To him, our house is being bombed.  Poor thing gets panic attacks every time we hear guns go off.

Since it came to the point that he didn’t even want to go for walks, we had to do something else to get him outside.  Eventually, we figured the best thing was to drive somewhere and have him walk there.  Taylor Beach was the closest within driving distance…

Sheep next to the parking lot.

Beautiful day!

Looking North…

Broski

Happy Clausy!

🙂 Julie

artist profile: Simon Roy

My best friend Kathleen’s boyfriend, Simon Roy, is an art student currently in Calgary.  He has some comic books published.

I’ll admit: I wasn’t much a fan of his work, which consists of sci-fi robot/warfare comic books (hey, I’m a girl).  But I’m in love with one of his latest pieces:

I’m in love with this pattern piece!  I’m almost tempted to bring it to a printer and have a t-shirt made from it.

Grotesque? Sure.  Amazing colours, though.

Axis.

Who killed the Mammoth?

All artwork featured in this post were pulled from Simon’s flickr page.  To check out Simon’s flickr page, click here.

To check out Simon’s blog, click here.

🙂 Julie